

- We check the architecture for strength – an attempt to cram in the unintelligible – we fasten the network resource collection module.
- Auxiliary utilities – consider the logger, command-line argument processing, additional tools that hide functionality under the hood and allow you to write
beautiful and extensible code. (I left only the argument parser, because the rest is quite primitive implemented and I’m ashamed to show it to people) - And what happens if… We are thinking about the possibility of expanding the product to collect information not only with direct connection.
- Re-checking the architecture for durability. We are screwing up the module for mass processing of networks.
- Brick, brick, more brick – but it doesn’t work. Or how I struggled with turning a VPS into a brick after the first VPN connection.
- Again about architecture. We continue to design the VPN interaction module.
- Beautiful video with the results of the work.
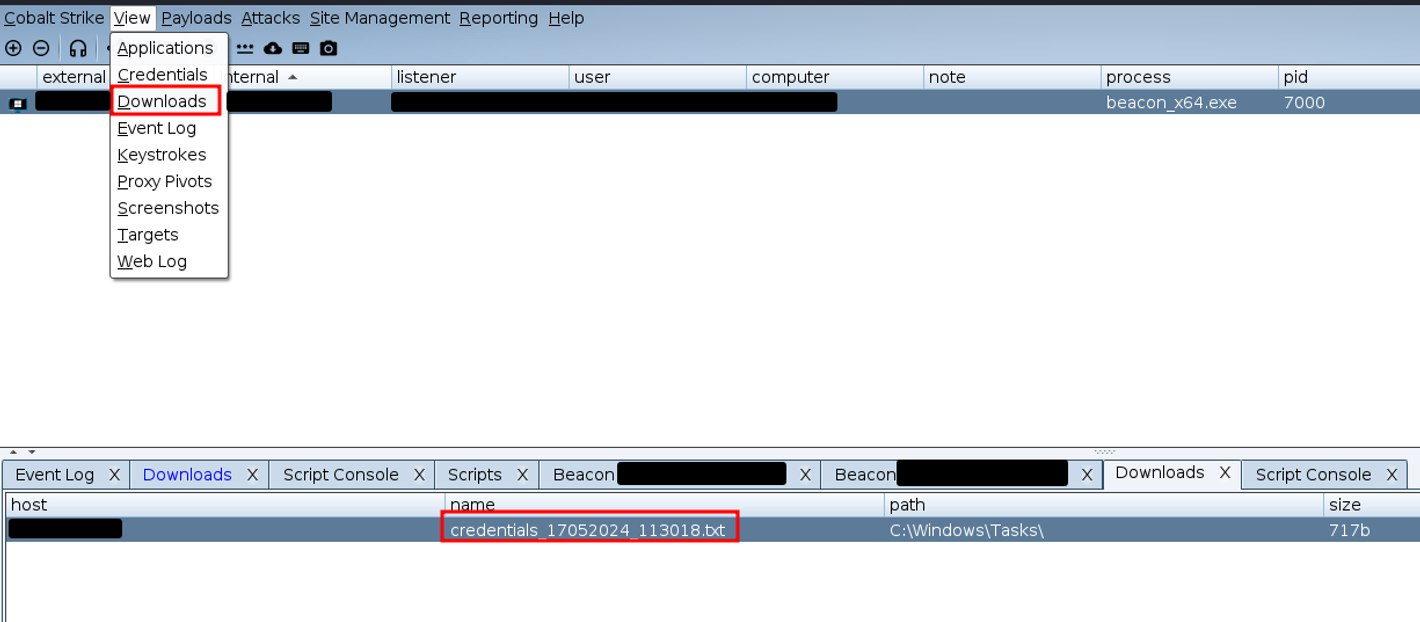
1 ShareEnumerator
Last time, we designed a dump collection module. Now we need to add the collection of information about shared network resources here. Naturally, we will call it nothing else than ShareEnumerator.
We begin to reason out loud again.
First you need to understand what we want. Then think about how to implement it, taking into account the existing architecture. What tools will we use for this?
1.1 Teach the match, comrades.
As with the previous task, it would be naive to believe that I am the first one who needed it. So we start Googling. There are a lot of different Shareenumerators on the github. For the most part, they are not interesting to us. We have our own goat on lisapede. But peeking at the tools used by their authors is not a sin at all.
After studying several projects, it becomes clear that the task can be divided into two subtasks:
- Collect a list of computers on the network.
- Poll every computer found using the SMB protocol for the presence of a ball.
We look carefully at point 1 and understand that this part we have a wonderful LDAPDataCollector, which can do a lot. Including getting a list of hosts. At this stage, the task can
be considered solved, it remains only to think about how to carefully insert it into the code so as not to break anything.
We look carefully at the second point. It seems to be nothing complicated. It remains only to understand what kind of samba it is and what it is eaten with. Open the wiki and see the following: SMB (short from the English Server Message Block) — network
An application-level protocol for remote access to files, printers, and other network resources, as well as for interprocess communication.
The principle of its operation is described here:
SMB is a protocol based on client—server technology that provides client applications with an easy way to read and write files, as well as request services from server programs in various types of network environments. Servers provide file systems and other resources (printers, mail segments, named pipes, etc.) for network sharing. Client computers can have their own storage media,
but also have access to resources provided by the server for public use.
The age-old question arises: “What should I do?”. We have two paths again. Writing your own implementation of interaction with samba is a fun and difficult task. It’s good, of course, but before I do anything, I always ask myself another question: “what the fuck?”. If I couldn’t get a clear answer, then I don’t really need it. Okay, it’s all lyrics. Do what? We’re going to Google again. More precisely, on github. And there we find such a thing https://github.com/ShawnDEvans/smbmap .
She even seems to be able to do what we need. We are trying to understand. After this line:
if not args.file_content_search:
    if not args.dlPath and not args.upload and not args.delFile and not args.list_drives and not args.command and not args.version and not args.signing:
My brain is broken. He switched to a rebooter. And there are almost 2 thousand lines of code. Returning to reality, I carefully looked through the import section. And I found that the guys are actively using impacket. As you know, people are divided into 3 main categories:
- smart – they learn from the mistakes of others, they are always doing well. It is very difficult to get into this category, bypassing the rest. But this, again, is not relevant to the topic.
- Fools learn from their mistakes. There is even a hypothesis that an experienced fool can become smart
- fucking* would like to – they don’t study at all.
1.2 Designing a balloon collection module
Since we already know how to get a list of computers, it is logical to transfer it to the config of our future product. By product, in this context, we mean the heir of the AbstractProduct class,
which we designed in the first part. This is on the one hand. And on the other – “what the fuck?”. Let’s try to figure out the parameters that we need to get to get a list
of available network resources.
Go. We will get two blocks of parameters.
- LDAPDataCollector Parameters
- domain name;
- domain controller address;
- username;
- password;
- flag for SSL connection. By default, set it to False and forget
about it for now.
- Parameters for the ball.
Let’s talk out loud again. What can we need and do we need it here and now? We assume that the full path (we have already received the name of the balls).
- Checking read and write permissions. Moreover, we will perform each check separately. Therefore, we automatically have two flags: is_check_read_access_enabled
and is_check_write_access_enabled - number of threads – if there are a lot of computers on the network, it is very desirable to work in several threads. But if there is some kind of evil avery sitting there, then we must try not to wake him up. And controlling this parameter will help us a little bit in this.
- timeout – the reason is the same as in the paragraph above. Setting the desired time interval between requests.
- the format of the file for saving the results – the results must be saved somewhere. I do not know how I will do this yet, but I know for sure that the results should be suitable either for subsequent machine processing, or presented in a readable form. That is, as a result, we will have at least 3 output formats: csv and json – for subsequent machine processing, as well as xlsx – if we want to see the results with our eyes.
In total, we have two disjoint sets of parameters.
And where, I ask, should we attach a list of computers, if we receive it in the process of work, and do not transfer it from a file? The correct answer is that he has nothing to do in the config. We have a set of parameters that allows us to get it. That’s more than enough. But here’s the thing. When studying the class documentation
Smb Connection it turned out that we can log in in two ways:
- using a username and password – that’s the answer to part of the question;
- via Kerberos – I will not consider this case here, but it is implemented in the project;
To log in via kerbu, you will have to pull more parameters. So, the configuration for the balloon collection module will be as follows:
    class ShareEnumConfig(AppConfig):

        def __init__(self, is_ignore_hidden_shares_enabled: bool
                , is_check_read_access_enabled: bool
                , is_check_write_access_enabled: bool
                , thread_count: int
                , force_no_dns: bool
                , timeout: int
                , outfile_type: str
                , unique_path_length: int
                , comment_length: int
                , is_need_use_kerberos: bool
                , aes_key: str
                , no_pass: bool
                , auth_hashes: str
                , dc_ip: str
                , username: str
                , password: str
                , domain_name: str):
            super().__init__()

            self.domain_name = domain_name
            self.is_ignore_hidden_shares_enabled = is_ignore_hidden_shares_enabled
            self.is_check_read_access_enabled = is_check_read_access_enabled
            self.is_check_write_access_enabled = is_check_write_access_enabled

            self.thread_count = thread_count
            self.force_no_dns = force_no_dns
            self.timeout = timeout

            self.outfile_type = outfile_type
            self.outfile = ''
            self.unique_path_length = unique_path_length
            self.comment_length = comment_length

            self.is_need_use_kerberos = is_need_use_kerberos
            self.no_pass = no_pass
            self.auth_hashes = auth_hashes
            self.aes_key = aes_key

            self.dc_ip = dc_ip
            self.username = username
            self.password = password
1.2.1 Sharesfinder. Are there any balloons? And if I find it?
As mentioned earlier, we will collect the balls using the SMB protocol. Again, we ask ourselves the question: “What is necessary to solve the problem?” and try to answer it. Obviously, we
will need:
- establish a connection to the server;
- log in;
- Execute the request;
- Save the results for later processing;
- Disconnect.
We should also not forget about multithreading and timeouts.
Go.
Let’s declare a new class and call it ShareFinder. We will pass our config to him in the constructor. In the same place, in the constructor, we will declare the domain_computers field as a list. We’ll fill it from the outside when the collector runs out.
We also need some kind of data structure to save the results. Obviously, we will have a dictionary, the key of which will be the name of the computer, and the value will be a list of balls belonging to it.
It will turn out something like the following:
    class ShareFinder:
        def __init__(self, config: ShareEnumConfig):
            self.config = config
            self.result = defaultdict(list)
            self.domain_computers = list()
Now about multithreading. Let’s use the standard thread pool. That’s what his documentation says.
        concurrent. futures. thread. ThreadPoolExecutor
            def __init__(self,
            max_workers: int | None = None,
            thread_name_prefix: str = "",
            initializer: (...) -> object | None = None,
            initargs: tuple[Any, ...] = ()) -> None
        Initializes a new ThreadPoolExecutor instance.  Args: max_workers: The maximum number of threads that can be used to execute the given calls. thread_name_prefix: An optional name prefix to give our threads. initializer: A callable used to initialize worker threads. initargs: A tuple of arguments to pass to the initializer.
That is, this is where we will transfer the number of threads. And what exactly are we going to do in streams. That’s right – to poll each computer for a ball and record the results in a common collection of results. Not forgetting, of course, that we are working with a shared resource, which means that each thread must be able to lock the resource for writing.
To implement this functionality, we will need a method, let’s call it worker. which we will feed to our pool.
As a result, it turned out something like this.
  def run(self):
        auth_lm_hash = ""
        auth_nt_hash = ""
        if self.config.auth_hashes is not None:
            if ":" in self.config.auth_hashes:
                auth_lm_hash = self.config.auth_hashes.split(":")[0]
                auth_nt_hash = self.config.auth_hashes.split(":")[1]
            else:
                auth_nt_hash = self.config.auth_hashes
        results = {}

        # Setup thread lock to properly write in the file
        lock = threading.Lock()

        with ThreadPoolExecutor(max_workers=min(self.config.thread_count, len(self.domain_computers))) as tp:
            for computer in self.domain_computers:
                tp.submit(self.worker, computer, self.config.domain_name, self.config.username,
                            self.config.password, computer, auth_lm_hash, auth_nt_hash, self.result, lock)
                time.sleep(self.config.timeout)
As you can see, the timeout was also used.
Now let’s look at the worker method itself. It’s quite simple, so I’ll just give you its code.
    def worker(self, target_name, domain, username, password, address, lmhash, nthash, results, lock):
        if self.config.force_no_dns:
            target = target_name
        else:
            target_ip = nslookup.Nslookup(dns_servers=[self.config.dc_ip], verbose=True).dns_lookup(target_name).answer
            if len(target_ip) != 0:
                target = target_ip[0]
            else:
                return
        try:
            smb_client = self.init_smb_session(target, domain, username, password, address, lmhash, nthash)
            resp = smb_client.listShares()
            for share in resp:
                # SHARE_INFO_1 structure (lmshare.h)
                # https://docs.microsoft.com/en-us/windows/win32/api/lmshare/ns-lmshare-share_info_1
                share_name = share['shi1_netname'][:-1]
                share_comment = share['shi1_remark'][:-1]
                share_type = share['shi1_type']
                share_path = "\\".join(['', '', target, share_name])
                unique_path = "\\".join(['', '', target, share_name, ''])

                permission = []

                self.__check_share_read_access(permission, share_path)
                self.__check_share_write_access(permission, share_path)

                try:
                    lock.acquire()
                    if target_name not in results.keys():
                        results[target_name] = []
                    results[target_name].append(
                        {
                            "share": share_name,
                            "computer": target_name,
                            "hidden": (True if share_name.endswith('$') else False),
                            "uncpath": unique_path,
                            "comment": share_comment,
                            "permission": ', '.join(permission),
                            "type": {
                                "stype_value": share_type,
                                "stype_flags": self.STYPE_MASK(share_type)
                            }
                        }
                    )

                    self.__print_share_info(address, share_comment, share_name)
                finally:
                    lock.release()
            self.result = results

        except Exception as e:
            print(e)
At this point, the implementation can be considered complete.
1.3 Builder configuration and product assembly.
1.3.1 ShareEnumModeConfigurator.
All we have to do is specify the parameters for saving the result to the builder. There will be a minimum of code here.
        class ShareEnumModeConfigurator(AppConfigurator):
            def __init__(self, share_enum_config: ShareEnumConfig, domain_name: str, out_dir: str = 'evil-corp'):
                super().__init__(domain_name, 'shares', out_dir)
                self.config = share_enum_config

            def setup(self):
                self.create_out_dirs()
                    out_type = self.config.outfile_type
                if out_type == 'txt':
                    outfile = 'shares.txt'
                elif out_type == 'json':
                    outfile = 'shares.json'
                elif out_type == 'yaml':
                    outfile = 'shares.yaml'
                elif out_type == 'csv':
                    outfile = 'shares.csv'
                elif out_type == 'xlsx':
                    outfile = 'shares.xlsx'
                else:
                    DumpLogger.print_warning(
                    f'An unsupported output file format is specified. The default value ("*.csv") will be used')
                    outfile = 'shares.csv'
                self.config.out_filename = os.path.join(self._current_mode_out_dir, outfile)

            def create_out_dirs(self):
                super().create_out_dirs()
1.3.2 ShareEnumBuilder.
We built, built, and finally built.
There’s nothing complicated here either. We will first ask the Ldap Data Collector to collect a list of computers on the network. Then we turn to Sharefinder with a request to collect the balls. And we will record the result in a product that already knows how to save it. We only need 20 lines for everything. Magic, however.
        class ShareEnumBuilder(AbstractBuilder):
            def __init__(self, app_config: ShareEnumConfig, data_collector: LdapDataCollector):
                super().__init__(data_collector)
                self.app_config = app_config

            def build_product(self) -> AbstractProduct | None:
                DumpLogger.print_title('SHARE ENUMERATOR: build product')
                try:
                    self.data_collector.get_domain_computers_full_info()
                    domain_computers = self.data_collector.domain_computers

                    share_finder = ShareFinder(self.app_config)
                    share_finder.domain_computers = domain_computers
                    share_finder.run()
                    share_enumerator = ShareEnumerator()
                    share_enumerator.results = share_finder.result
                    self.is_build_completed = True
                    return share_enumerator
                except Exception as err:
                    self.error_message = f'share enumeration failed with error {err}'
                    self.setup_incomplete_product(err, self.error_message)
                    return None
Finally, let’s look at the save method of the ShareEnumerator product. The result arrives at his entrance in the following format:
results = [

{'share': 'ADMIN$'
    , 'computer': 'DELL5490-AIO.HQ.EVIL.CORP.COM'
    , 'hidden': True
    , 'uncpath': '\\\\DELL5490-AIO.HQ.EVIL.CORP.COM\\ADMIN$\\'
    , 'comment': 'Remote Admin'
    , 'permission': ''
    , 'type': {'stype_value': 2147483648, 'stype_flags': ['STYPE_DISKTREE', 'STYPE_TEMPORARY']}},
{'share': 'C$', 'computer': 'DELL5490-AIO.HQ.EVIL.CORP.COM', 'hidden': True,
    'uncpath': '\\\\DELL5490-AIO.HQ.EVIL.CORP.COM\\C$\\', 'comment': 'Default share', 'permission': 'r,w',
    'type': {'stype_value': 2147483648, 'stype_flags': ['STYPE_DISKTREE', 'STYPE_TEMPORARY']}},
{'share': 'ADMIN$', 'computer': 'DELLACHAT-UFF.HQ.EVIL.CORP.COM', 'hidden': True,
    'uncpath': '\\\\DELLACHAT-UFF.HQ.EVIL.CORP.COM\\ADMIN$\\', 'comment': 'Remote Admin', 'permission': 'r',
    'type': {'stype_value': 2147483648, 'stype_flags': ['STYPE_DISKTREE', 'STYPE_TEMPORARY']}},
{'share': 'C$', 'computer': 'DELLACHAT-UFF.HQ.EVIL.CORP.COM', 'hidden': True,
    'uncpath': '\\\\DELLACHAT-UFF.HQ.EVIL.CORP.COM\\C$\\', 'comment': 'Default share', 'permission': 'r',
    'type': {'stype_value': 2147483648, 'stype_flags': ['STYPE_DISKTREE', 'STYPE_TEMPORARY']}},
{'share': 'ADMIN$', 'computer': 'DELLFRANK-AIO.HQ.EVIL.CORP.COM', 'hidden': True,
    'uncpath': '\\\\DELLFRANK-AIO.HQ.EVIL.CORP.COM\\ADMIN$\\', 'comment': 'Remote Admin', 'permission': 'r',
    'type': {'stype_value': 2147483648, 'stype_flags': ['STYPE_DISKTREE', 'STYPE_TEMPORARY']}},
{'share': 'IPC$', 'computer': 'DELLFRANK-AIO.HQ.EVIL.CORP.COM', 'hidden': True,
    'uncpath': '\\\\DELLFRANK-AIO.HQ.EVIL.CORP.COM\\IPC$\\', 'comment': 'Remote IPC', 'permission': 'r',
    'type': {'stype_value': 2147483651, 'stype_flags': ['STYPE_IPC', 'STYPE_TEMPORARY']}},
]
Here, too, we have kept within 15 lines. Magic again? No. It’s just a well-designed architecture.
def save(self, app_config: ShareEnumConfig):
        out_type = app_config.outfile_type
        filename = app_config.out_filename
        if out_type == 'txt':
            FileHelper.save_results_to_txt(self.results, filename)
        elif out_type == 'json':
            FileHelper.save_results_to_json(self.results, filename)
        elif out_type == 'yaml':
            FileHelper.save_results_to_yaml(self.results, filename)
        elif out_type == 'csv':
            FileHelper.save_share_enumeration_results_to_csv(self.results, filename)
        elif out_type == 'xlsx':
            FileHelper.save_results_to_xlsx(self.results, filename)
        else:
            DumpLogger.print_warning('An unsupported output file format is specified. The default value will be used')
1.3. Conclusions.
The module for listing network shares does not look like the lamps described in the previous article. Nevertheless, we managed to integrate it into the existing architecture without any problems.
This means that the approach was chosen correctly. The architecture may not be perfect, but it is stable enough. We managed to separate the implementation and the business rules. We are not done here.
After reviewing the implementation of auxiliary utilities, we will try to expand the product and use it for mass network scanning.
2 Argumentparser. The method of a definite integral in action.
The method of a certain integral – any complex task must be divided into a finite set of simple subtasks, each of which has a constant execution time. It is also called “divide and conquer” or decomposition. Let’s try to apply it here too.
As I said in the first part, the implementation of command-line argument parsing in many open-source projects leaves much to be desired. I gave an example above. We don’t need this kind of hockey. Therefore, we will do everything according to science.
Go.
2.1 Sketches of architecture.
To begin with, let’s remember that we have several modes of operation, each of which asks for its own set of parameters. For dumps, these parameters will be the same, except for the type of dump itself. To collect the ball, we will add additional parameters, as I wrote above. All this mess must be sorted out in some way without violating the basic architecture. But more on that later. In the meantime, let’s ask ourselves the following question. Where does any program start? Right. From the help or manual. It is very important that an ordinary user using our
product for the first time and typing in the console
program.exe --helpI got the clearest and most detailed description of all the modes of operation of the application, and not just a beautiful ASCII image that all open source users love so much. Therefore, our module should be able to make beautiful help.
What else? In a good way, it should be a tool that works on the principle: “I set it up once and forgot.” Therefore, it must have some kind of configuration tool. Hmm… And we already have a configurator. But what if … It seems like a good idea, but more on that later.
We also need to be able to set arbitrary sets of parameters under the hood and group them according to some common feature. That is, we will have at least groups of parameters for dumps and balls. But what comes into our heads tomorrow is a big secret. Therefore, we must also lay down the possibility of expansion here.
Let’s move on. Well, we’ve parsed the parameters. What should I do with them? Return. And what should I return? A dimensionless tuple? Stop. We have configs for each mode. Why not return them. There is already some sense in this. That is, we disassembled the parameters, formed the config and immediately checked its validity. If we have been given bullshit, then we immediately declare it, and do not pass it on. Hence, the correct error handling is also requested. Okay, that’s enough words. Let’s get started.
2.2 Parsing command line arguments.
Python, for all my dislike of it, has one advantage. There are a huge number of packages, and many of them are of very high quality. That is, they can be taken and used out of the box. Which we will do. Our argument parser is based on a standard Python parser. If you are interested, read the documentation. I’m going to tell you here about how I once again shoved the seemingly impossible in. Namely, I built the parser into the architecture, so that by running it through the configurator we got a ready–to-use product.
2.2.1 We configure the standard Python parser for our needs
Obviously, we will have two groups of parameters – mandatory: everything related to LDAP and optional – additional parameters, for example, of the same Shareenumerator. So, let’s declare the ArgsParserConfigurator class, derived from AppConfigurator. It will have exactly one field of its own. This is an object of the argsparse class.ArgumentParser. That’s what we’re going to set up.
We will have a constructor like this:
        class ArgsParserConfigurator(AppConfigurator):
            def __init__(self, domain_name: str = 'evil-corp.com', out_dir: str = 'evil-corp'):
            super().__init__(domain_name, 'args parser', out_dir)
                self.parser = argparse.ArgumentParser(
                description='A pentest  tool for obtaining a variety of information about the network AD with LDAP',
                usage='%(prog)s     '
                f' Collects  the following information'
                'about users and computers on the network:\n'
                f'{DumpLogger.highlight_green("MINIDUMP")} mode:\n'
                f'\t--{DumpLogger.highlight_green("Authentication mechanism")};\n'
                f'\t--{DumpLogger.highlight_green("List of domain users")};\n'
                f'\t--{DumpLogger.highlight_green("List of domain admins")};\n'
                f'\t--{DumpLogger.highlight_green("List of enterprise admins")};\n'
                f'\t--{DumpLogger.highlight_green("List of domain controllers")};\n'
                f'\t--{DumpLogger.highlight_green("List of domain trusts")};\n'
                f'\t--{DumpLogger.highlight_green("List of servers")}, including the host name,'
                ' name and version of the operating system for each server;\n'
                f'\t--{DumpLogger.highlight_green("List of users PC")}, including the host name,'
                ' name and version of the operating system for each computer;\n'
                f'\t--{DumpLogger.highlight_green("OS statistic:")} '
                f'a list of computers for each operating system version;\n'
                '********************************************************************************************\n'
                f'{DumpLogger.highlight_green("FULLDUMP")} mode:'
                f' repeating a functional of MINIDUMP mode with additional information:\n'
                f'\t--{DumpLogger.highlight_green("List of domain groups")}\n'
                f'\t--{DumpLogger.highlight_green("List of domain organization")} units\n'
                f'\t--{DumpLogger.highlight_green("List of domain subnets")}\n'
                '********************************************************************************************\n'
                f'{DumpLogger.highlight_green("SHARES")}:'
                f' collect information about network shared resources'
                'and save the results  in the specified format.\n'
                f'See {DumpLogger.highlight_green("SHARES")} mode help for more information\n'
                '********************************************************************************************\n'
                f'{DumpLogger.highlight_green("FASTDUMP")}: collects count of users, '
                f'count of computers and list of groups of which the user is a member '
            )
            self.parser.version = 'ADDumper version: 0.3.0-beta'
Now let’s redefine the method of the base class setup and look at part of its implementation. It is extremely simple.
def setup(self):
        self.__setup_required_params()
        self.__setup_optionals_params()
Using the example of the __setup_required_params() method, consider configuring the required parameters.
  def __setup_required_params(self):
        required_params = self.parser.add_argument_group(f'{DumpLogger.highlight_blue("required arguments")}')
        required_params.add_argument(    '-m', '--mode', dest='mode', type=str, required=True,
                                        help=f'the current version supports the following operating modes: '
                                        f'{DumpLogger.highlight_green("MINIDUMP, FULLDUMP, KERB, SHARES, FASTDUMP")}.'
                                    )
        ldap_params = self.parser.add_argument_group(DumpLogger.highlight_blue('LDAP params'))
        ldap_params.description = f'{DumpLogger.highlight_warning("LDAP connection params. Required.")}'
        ldap_params.add_argument(    '-d', '--domain', dest='domain', type=str
                                    , help='The name of domain (e.g. "test.local"). '
                                    f'{DumpLogger.highlight_dark_blue("If the value is not set, it will be determined automatically")}',
                                    required=True
                                )
        ldap_params.add_argument(    '-u', '--username', metavar='username', dest='username', type=str
                                    , help=f'The user name, required parameter for the LDAP connection', required=True)
                                    ldap_params.add_argument('-p', '--password', metavar='password', dest='password', type=str
                                    , help='The user password required parameter '
                                    , required=True
                                )
        ldap_params.add_argument(    '-ip', metavar='[ip-address]', dest='ip_address', type=str, required=True,
                                    help='The IP address of the server (e.g. "192.168.13.169"). '
                                    f'{DumpLogger.highlight_dark_blue("If the value is not set, it will be determined automatically")}',
                                    default=None
                                )
What we actually did. We put the mandatory arguments in a separate group. For each parameter, the type, description, flag name were specified, and help was added. Similar work needs to be done for optional parameters. In fact, as a finished product, we took a standard parser and configured it in the configurator. We will also create the configurator using the factory. To do this, add another method to it.
        class ConfiguratorsFactory:

            @staticmethod
            def create_args_parser_configurator(out_dir: str = 'evil-corp') -> ArgsParserConfigurator:
                return ArgsParserConfigurator(out_dir=out_dir)
Perhaps not the most successful architectural solution, but let’s see how it fits into
the overall picture.
2.2.2 Getting configs
After setting up the parser, we are almost ready to work. All that remains is to add a little magic and get configs from the arguments. Which is exactly what we’re going to do. So that all the pornography of the parser settings does not stick out, we will cover it up a little. And we’ll put the already configured parser in a class that we’ll call Configmaker. And we will pass our already configured parser to the input of its constructor.
    class ConfigMiner:
        def __init__(self, parser: argparse.ArgumentParser):
            self.base_dn = ''
            self.args = None
            self.domain_name: str = ''
            self.out_dir: str = ''
            self.program_mode = ProgramMode.UNKNOWN
            self.parser = parser
            self.ldap_config = None
            self.kerb_config = None
            self.fulldump_config = None
            self.minidump_config = None
            self.share_enumerator_config = None
            self.fastdump_config = None
This class should be able to do exactly two things:
- give the command to the parser to parse;
- assemble the necessary config from the received parameters and be ready to return it on the first
request.
Actually, everything. Below I have given its code and an example of its use. I think that’s enough about the parser. Designer:
class ConfigMiner:
    def __init__(self, parser: argparse.ArgumentParser):
        self.base_dn = ''
        self.args = None
        self.domain_name: str = ''
        self.out_dir: str = ''
        self.program_mode = ProgramMode.UNKNOWN
        self.parser = parser
        self.ldap_config = None
        self.kerb_config = None
        self.fulldump_config = None
        self.minidump_config = None
        self.share_enumerator_config = None
The start method, which runs both listed tasks sequentially.
    def start(self) -> bool:
        try:
            args = self.parser.parse_args()
            print(args)

        except Exception as err:
            DumpLogger.print_error_message(err.args)
            return False
        mode = args.mode
        self.out_dir = args.out_dir
        if not self.is_valid_program_mode(mode):
            DumpLogger.print_error_message('ERROR: unknown program mode')
            return False
        domain_name = args.domain

        self.base_dn = NetworkUtils.get_base_dn(domain_name)
        if self.base_dn is None:
            DumpLogger.print_error_message(f'invalid domain name:\t {domain_name}')
            return False
            self.domain_name = domain_name
        try:
            if not self.is_ldap_config_created(args, self.base_dn):
                DumpLogger.print_error_message('can\'t create LDAP config')
                return False

            if self.program_mode == ProgramMode.MINI_DUMP:
                self.make_minidump_config()
            if self.program_mode == ProgramMode.FULL_DUMP:
                self.make_fulldump_config()
            if self.program_mode == ProgramMode.KERB:
                self.make_kerb_config(args)
            if self.program_mode == ProgramMode.SHARES:
                self.make_share_finder_config(args)
            if self.program_mode == ProgramMode.FAST_DUMP:
                self.make_fastdump_config(args)
        except Exception as error:
            print(error.args)
            return False
        return True
And finally, an example of using all this goodness.
    def run(self) -> bool:
        args_parser_configurator = ConfiguratorsFactory.create_args_parser_configurator()
        args_parser_configurator.setup()
        parser = args_parser_configurator.parser
        miner = ConfigMiner(parser)
        try:
            if not miner.start():
                DumpLogger.print_error_message('invalid arguments, use \'ADDumper --help\' for more information')
                return False
        except Exception as err:
            DumpLogger.print_error('Can\'t create Argument parser', str(err))
            return False

        self.program_mode = miner.program_mode
        self.out_dir = miner.out_dir

        ldap_config: LdapConfig = miner.ldap_config
         self.ldap_connection = source.core.ldap.ldap_connection.LdapConnection(ldap_config)
         ldap_config.print()
         if not self.ldap_connection.is_ldap_connection_established():
             DumpLogger.print_error_message('failed to establish LDAP connection')
             ldap_config.print()
             return False
         query_executor_config = ConfigFactory.create_ldap_query_executor_config(self.ldap_connection,
         miner.base_dn)
         query_executor = LdapQueryExecutor(query_executor_config)
         data_collector_config = ConfigFactory.create_data_collector_config(query_executor)
         data_collector = LdapDataCollector(data_collector_config)
         self.domain_name = miner.domain_name
         if program_mode == ProgramMode.KERB:
             return self.run_kerberos_mode(miner.kerb_config, data_collector)
         elif program_mode == ProgramMode.SHARES:
             return self.run_share_enumeration(miner.share_enumerator_config, data_collector)
         elif program_mode == ProgramMode.FULL_DUMP:
             return self.run_fulldump_mode(miner.fulldump_config, data_collector)
         elif program_mode == ProgramMode.MINI_DUMP:
             return self.run_minidump_mode(miner.minidump_config, data_collector)
         elif program_mode == ProgramMode.FAST_DUMP:
             return self.run_fastdump_mode(miner.fastdump_config, data_collector)
         else:
             DumpLogger.print_error('invalid program mode', str(program_mode))
             return False
2.3 Conclusions.
Despite the fact that working with command–line arguments, as you can see, is still a pleasure, we managed to integrate it relatively painlessly (processing command-line arguments) without violating the integrity of the application architecture. Perhaps the solution is not the most successful, but it is working and it took most of the implementation time to prescribe references for each parameter, rather than directly writing the code.
3 One network is good, but much better.
Well, it turned out to be a completely sane product that can be used and people are not ashamed to show it. Compatible with any Linux on board,proxychains up to the network and ran.
For tests, this is definitely a plus. And if you put a little effort into it, you can set up remote debugging and it will generally turn out beautifully.
However, what to do if there are a lot of networks and most of them are forts and cisks. Of course, you can connect with your hands through official clients. Yes, it is possible. If you have 3-5 networks per week. And you know for sure that they are 100% valid: the account is live and the user is in the domain at least. Otherwise, when the networks come from the logs, my hand fell off to poke the mouse after two hours.
What to do?
Let’s talk out loud. What do we have? We have a product that is completely independent of the connection method. That is, I don’t care how the connection is made. It’s good. Now let’s see what connection methods are possible. Let’s consider two main ones:
- VPN
- Proxy
Let’s start with the second one. Everything should be relatively simple here. If we have a list of proxy accesses, then we can write an external script that will generate a config for proxychains and connect through it. Something like this should happen:
Open the file with the proxy list.
         We are reading this list.
         for line in proxyList:
             generate a config for proxychains
             run the script through a proxy
Since this method is less relevant, I have not implemented it. We are much more interested
in the possibility of connecting via VPN. Let’s see what we can do here.
3.1 OpenConnect. What is it and what it is eaten with.
In order not to breed further rubbish about the choice of tools here. Let’s focus on OpenConnect. An excellent product that supports several protocols, in particular:
- Cisco’s AnyConnect SSL VPN;
- Fortinet Fortigate SSL VPN;
- Palo Alto Networks GlobalProtect SSL VPN;
There are others, but I haven’t tested them, the animals are too rare. Correct me if I’m wrong, but I haven’t seen them in the wild. Excellent is what you need. We open the documentation and see that in order to connect, we need to specify several parameters, such as:
- username;
- password;
- address;
- vpn group is an optional parameter that indicates whether the user
belongs to a group; - protocol – the protocol that will be used to connect. Cisco anyconnect is used by default. The rest must be specified explicitly. For example, –protocol=fortinet
Great. We take the first available access, install openconnect on the board and try to connect. We got something like this connection string:
openconnect -b --protocol=anyconnect --user=test 196.204.212.170:443
We’re launching it. He asked for the password. We introduce it. We make a note that it is necessary to automate password entry. He also asks to check the fingerprint. We say that it’s OK, we also put a note about automation. Connected. We’re trying to get started. Hooray. It’s working. Great. Now it’s a small matter to automate everything.
3.2 Automation of the connection.
Without going into much detail, I will tell you about the main problems that arose during connection automation.
Go.
We will launch via subprocess.
3.2.1 Entering the password and fingerprint
Here it turned out to do with relatively little blood, for which a separate thank you to the developers of the product. To enter the password, use the built–in -passwd-on-stdin flag.
The print is a little more complicated. But no more. We’ll just call the connection twice. The first time we will extract the fingerprint itself from the response and remember it, and during the second run we will pass it as
a parameter. As a result, you will get the following line:
openconnect -b --passwd-on-stdin --servercert={fingerprint} --protocol=anyconnect --user=test 196.204.212.170:443
The -b (background) flag launches openconnect in the background and allows you to perform arbitrary operations when connected.
3.2.2 Disconnection.
Great. We got involved, even worked out. But how do I switch off now? Fuck him, that’s all – it’s the first decision that came to mind. That’s what we’ll do. Launching htop. We look for the process and kill it. Hooray. Everything seems to be OK. But it’s with pens. And here’s how to automate it. And here is another praise for the product developers. They solved this problem for me – if you also specify the –pid-file flag, then he will kindly write his PID there. All we have to do is read it and bang it.
And the connection string is now like this:
openconnect -b --passwd-on-stdin --servercert={fingerprint} --pid-file=/tmp/openconnect.pid --protocol=anyconnect --user=test 196.204.212.170:443
3.2.3 A big bummer. Or how I built a big Indian national hut out of brick-encrusted VPS.
Wow. It’s cool, now it’s business. Write a couple of classes, laying down, as usual, for the possibility of expansion and we will be happy. “Yeah, shazzz,” the developers of the fortification thought to themselves and laughed so viciously.
I have sketched a script that connects via openconnect. Performs a couple of routine operations and shuts down. I have added accesses to the file for testing different protocols. Starting. The first cska went. Everything is OK. The second, the third. Everything works. I went for a smoke, I think: “I’ll come, stick it all into the project and the issue is closed.” “And here’s the figwam,” said the developers of the Forti.
Upon his return, he found that the suspension showed no signs of life. It can be seen in the logs that I processed several cisks correctly, but even broke on the fortification. Well, I decided that this was a glitch. I’m trying to connect from another terminal. There will be a picture about figs from prostokvashino. What the hell is this? I’m changing my dreams. Does not work. There is no connection, even if you crack. Okay, fuck you, goldfish. We are doing a re-installation. We run the same file again, but add more logs. The same balls, only in profile. After connecting to the fortification, it stops showing signs of life. I’ve banged my head against these bricks 15 times. To no avail. It’s already starting to get annoying. We arm ourselves with Google, we lay down manas on networks, vpns, openconnect.
In general, after some time, it was found out that many vpns change the network settings, making it inaccessible from the outside world. Therefore, a brick instead of a paintwork with a successful connection. What to do? I’ll skip my adventures on the way to finding a solution. It was very interesting, but the description will take a long time.
But the solution turned out to be quite simple. If you connect directly from the IPCC, then its sealing is guaranteed. But if you take a container and put all the work with the connection into it, then everything will be fine. That is, I took the LXD-container. I threw my software into it, and the container onto the board. All. Now, if the VPN kills my connection, then I will still have access to the VPN. and therefore to the container. Now it’s my turn to enjoy life.
3.2.4 Conclusions.
With the help of Google and some mother, we managed to more or less correctly implement the automation of connection and disconnection. Personally, I learned a lot about the principles of networks and VPNs, as well as the specifics
of the implementation of certain points. It was possible to combine previously studied theory and practice.
3.3 Architecture design and implementation
After all the dancing with tambourines, we managed to get the minimum working version of the external connection module. Now it needs to be brought to mind and integrated into the project, without breaking anything.
Go.
3.3.1 Connector.
At this stage, we are able to work with openconnect. It’s good. What if we need to use a protocol that is not supported by it? And there was something else said about the proxy. It’s not necessary right now, but it may be necessary later. At the same time, I again have no idea what it will look like. The connector factory is asking for it again. Let’s figure out the basic functionality of the connector:
- Connection – everything is obvious here. We will need at least 3 parameters that will
be required for any type of connection. This is the address, username and password. - Disconnection – this thing should be able to disconnect and correctly restore
network parameters if the VPN has broken them. - Error handling – if something went wrong, we need to get as much information about it as possible.
So we have the base class interface ready.
        class Connector:
            def __init__(self, connection_type: ConnectionType):
                self.CWD = ''
                self.CSD_WRAPPER_PATH = ''
                self.OPENCONNECT_PATH = 'openconnect'
                self.connection_type = connection_type
                self.password = ''
                self.username = ''
                self.address = ''
                self.last_error = ''

            @abstractmethod
            def setup(self, username: str, password: str, address: str):
                self.username = username
                self.password = password
                self.address = address

            @abstractmethod
            def is_connection_established(self) -> bool:
                pass

            @abstractmethod
            def is_connection_broken(self) -> bool:
                pass
And here is its implementation in the OpenConnector class.
         class Openconnector(Connector):

             def __init__(self):
                 super().__init__(ConnectionType.OPENCONNECT)
                 self.vpn_group = ''
                 self.vpn_type = ''
                 self.gateway_address = ''
                 self.gateway_name = ''

             def setup(self, username: str, password: str, address: str, vpn_group: str = '', vpn_type: str = 'anyconnect'):
                 super().setup(username, password, address)
                 self.vpn_group = vpn_group
                 self.vpn_type = vpn_type

             def is_connection_established(self) -> bool:
                 success_connection_message = f'The connection to the {self.address} has been successfully established.'
                 try:
                     args = self.__setup_openconnect_args()
                     DumpLogger.print_param('openconnect args', str(args))

                     subprocess.run(args, stdout=subprocess.PIPE, input=f'{self.password}\n'.encode('utf-8'),
                     stderr=subprocess.PIPE, timeout=4)
                     return True
                 except Exception as err:
                     error_message = str(err)
                     if 'timed out after' in error_message:
                         DumpLogger.print_success(success_connection_message)
                         return True
                     DumpLogger.print_error('openconnector is_connection_established', str(err))
                     return False

            def is_connection_broken(self) -> bool:
                try:
                    DumpLogger.print_title('Openconnector is_connection_broken')
                    os.kill(self.__get_pid(), signal.SIGKILL)
                    return True
                except Exception as err:
                    DumpLogger.print_error('Openconnector is_connection_broken', str(err))
                    return False
As you can see, we have again got a fairly readable and compact code that does not contain anything superfluous. let’s add it to the project and continue to enjoy life.
3.3.2 Integration into the project
We have added a new module. And therefore, new command-line arguments have been added. This is the only module in the code of which we will have to make changes. And we have a really good reason for this. We remember about SOLID.
In short, I added the connection type and method of getting arguments to the arguments – from the command line or from a file. We store our vpns in a file. Ideally, of course, make a config file, and a configurator with a gui for it, but that’s a completely different story. Depending on the selected connection mode, we either start working immediately, assuming that the connection has already been established and if something is wrong with it, then this is no longer our problem, or
first, we connect in the specified way and, if the connection is successful, we start working. If an error occurs, we carefully write it in the logs and take the following set of parameters to connect.
That’s all the magic.
THE NOTE This article is for informational purposes only. We do not encourage you to commit any hacking. Everything you do is your responsibility.
TOX : 340EF1DCEEC5B395B9B45963F945C00238ADDEAC87C117F64F46206911474C61981D96420B72
Telegram : @DevSecAS
You might also like


More from Uncategorized

Fortinet FortiOS / FortiProxy Unauthorized RCE
CVE-2024-21762 is a buffer overflow write vulnerability in Fortinet Fortigate and FortiProxy. This vulnerability allows an unauthorized attacker to execute …
Cobalt Strike write own [Aggressor Script]
Introduction Cobalt Strike is a professional tool for conducting penetration testing and simulating the actions of attackers (adversary simulation).The main feature …
Bypass WD SmartScreen
WD SmartScreen bypass + MOTW evasion + Edge/Chrome 0 alerts (W10/W11) Today, I want to share something very easy and helpful. …